
This article is for content creators, small business owners, teachers, and anyone who regularly needs to prepare images for digital use but does not want to invest time learning professional-grade design software. If you need a tool that handles photo resizing alongside creative additions like filters, stickers, and text, all in one place and without a steep learning curve, this guide is for you. By the end, you will have a clear framework for evaluating your options, a solid understanding of what each tool type offers, and enough practical guidance to make a confident decision.
The Problem With Using Separate Tools for Resizing and Editing
The most common workflow mistake people make with online photo editing is treating resizing and creative editing as separate jobs requiring separate tools. In practice, they almost always happen together. A real estate agent resizes a property photo for a social media post and then needs to add a branded text overlay. A teacher shrinks a diagram to fit a slide and then wants to label it with arrows and callout text. A small business owner adjusts an image for an email header and then realizes it needs a filter to match the campaign’s visual tone.
Splitting those tasks between a dedicated resizer and a separate design editor means double the uploads, double the downloads, and an extra round of file management every time. The better solution is a single browser-based tool that treats resizing and creative editing as one connected workflow. The market now offers several strong options in that category, and knowing how to evaluate them is the key to choosing well rather than defaulting to whatever is most familiar.
What to Look For: Nine Evaluation Criteria
Before comparing tools, it helps to define the criteria that actually matter for this category. Using a consistent checklist across every platform you consider will give you a much clearer basis for comparison than a general impression formed by browsing marketing pages.
Resize Input Methods
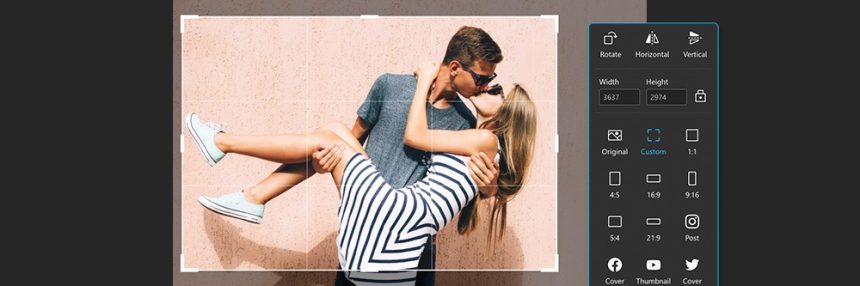
A capable photo resizer should offer at least two methods for entering dimensions. The first is a preset menu organized by use case or platform, covering common destinations like social media post formats, profile picture sizes, and standard print dimensions. The second is a manual entry option where you type in a specific pixel width and height. Both are necessary depending on the task. Presets save time for recurring jobs; manual entry handles precise specifications that do not match any preset. Tools that offer only one method create friction for the tasks the other handles well.
Quality Transparency When Scaling Up
Every image has a native resolution, and asking a tool to produce a larger version than the original source can introduce visible degradation. The distinguishing factor between strong and weak tools in this area is transparency: does the platform warn you before you download a potentially compromised file, or does it let you discover the quality issue after the fact? Look for tools that surface a visible warning or caution when an upscale operation is likely to affect sharpness, and that offer a suggested alternative, such as a different aspect ratio preset, to help you avoid the problem.
Filter Library and Preview Capability
Filters are one of the fastest ways to establish a consistent visual tone across a set of images, which is why they matter so much for social media managers and marketers working with brand aesthetics. Evaluate both the breadth of the filter library, meaning the range of styles from warm and vintage to cool and cinematic, and whether individual filters can be previewed before applying. A tool that forces you to apply a filter, evaluate it, undo it, and try the next one is significantly slower than one that displays a thumbnail preview of each option before commitment.
Text Tools and Font Availability
Adding text to a photo is one of the most commonly needed design tasks, and the quality of a tool’s text system varies enormously across platforms. Minimum requirements include the ability to position text freely anywhere on the image, change font size and color, and select from more than a handful of font options. Better tools offer access to a curated font library with enough variety to serve both casual and professional use cases, as well as basic styling controls like letter spacing, line height, and alignment. Pre-styled text templates that bundle font, size, and color choices into a single selectable option are a useful addition for non-designers who want polished results without making every styling decision manually.
Sticker and Graphic Element Library
Stickers and icons are no longer just a novelty feature. For social media content, they drive engagement. For educational materials, they provide visual cues. For marketing graphics, they add brand personality without the effort of original illustration. Evaluate whether the library is searchable and well-organized, whether the available elements cover professional and functional use cases alongside playful ones, and whether any animated elements are included on the free plan. A library with thousands of unlabeled thumbnails in a single scrollable grid is significantly less useful than a smaller but well-organized and searchable collection.
Background Removal Access on the Free Plan
Background removal has moved from a premium differentiator to a near-standard feature in this tool category, but its availability on free tiers varies. For users who regularly work with product photography, profile pictures, or composite images, the ability to remove a background before resizing and adding overlays is a genuinely important workflow step. Confirm specifically whether background removal is available on the free plan and whether it produces a clean, usable result on real-world photos with complex edges, since the quality of this feature also varies significantly.
Supported File Formats and Size Limits
Different editing contexts generate different file types. Professional photographers often work with HEIC files from Apple devices. Web teams commonly use WEBP for its compression efficiency. Graphic designers might work in PNG for transparency support. A tool that accepts only JPG files will create friction for anyone who regularly works in other formats. Check the platform’s list of accepted input formats and the maximum file size on the free plan, and confirm that the output format options include both JPG and PNG, since each serves different downstream needs.
Integration Between Resize and Edit
Perhaps the most practical criterion of all is whether the resize workflow connects directly to the editing workflow without requiring a re-upload. In the best implementations, you resize an image and then click a single button to open that resized version in the full editor with all filters, text tools, and graphic elements available. In weaker implementations, resizing and editing are siloed features that require you to download from one and upload to the other. The difference in daily time cost, multiplied across repeated use, is meaningful.
Learning Curve for New Users
A tool that requires tutorials to perform basic tasks is not a practical option for most of the users this guide addresses. Evaluate the learning curve honestly by attempting to complete a realistic editing task the first time you open the platform, without reading any documentation. Can you resize an image, apply a filter, add a text overlay, and download the result in under ten minutes on a first attempt? If the answer is no, the tool belongs in a different category than what this guide is evaluating.
Tool Categories in This Space
The market for photo resizers with design features can be organized into three distinct tool types, each with different strengths and trade-offs.
Browser-Based Quick-Action Editors
These tools are built around speed. The primary interface is designed for users who know what they need, want to accomplish it quickly, and do not require advanced editing capabilities. Resizing and common design tasks like filters, text, and stickers are available in a streamlined workflow with minimal interface complexity. Free plans in this category tend to be generous, with access to a useful core feature set at no cost. The trade-off is that these tools are not designed for advanced work like layer-based compositing, RAW file processing, or complex color grading.
For the majority of use cases this article covers, from social media content and email graphics to classroom materials and small business marketing, a browser-based quick-action editor provides more than enough capability with the least time investment. This is the category to start with unless you have confirmed advanced requirements.
Full Online Photo Editors
These are browser-based alternatives to desktop software like Photoshop. They offer layers, masking, curves, and a broader range of technical editing tools. Resizing is available, but it is one function among many in a complex interface that assumes more user knowledge. Free plans in this category are sometimes limited to a subset of features or include advertising that interrupts the editing experience. If your editing needs regularly go beyond what a quick-action editor can handle, this category is worth exploring. If they do not, the added complexity is a drawback rather than a benefit.
Template-Centered Design Platforms
These tools organize the editing experience around pre-built layouts rather than open-canvas image manipulation. You choose a template designed for a specific output format, drop your photo into it, and customize the surrounding design. Resizing in the conventional sense, changing the dimensions of an existing photo to meet specific requirements, is sometimes a secondary or premium feature in this category. These platforms are well suited to users creating formatted marketing materials but less suited to users who primarily need to prepare photos for specific dimensions with creative additions layered on top.
Adobe Express: One Strong Option Worth Considering
Among browser-based quick-action editors, the photo resizer from Adobe Express is one of the more capable free options available, particularly for users whose work is oriented around social media content, branded marketing materials, or regular digital publishing.
Social Platform Presets With Quality Warnings
The resize interface includes a dropdown menu of social media presets covering major platforms and content types, so you do not need to look up recommended dimensions separately. More importantly, when a selected preset would require scaling the source image up to a size that could reduce quality, Adobe Express surfaces a warning banner before you download. This is a meaningful safeguard that not every tool in this category provides, and it protects you from publishing a blurry image because you did not realize the original file was smaller than the target size.
A Direct Path From Resize to Full Creative Editor
After resizing, you can open the image directly in the full Adobe Express editor with a single click, without downloading and re-uploading. That editor includes access to a broad filter and enhancement library, thousands of free Adobe Fonts for text overlays, a searchable library of Adobe Stock icons and graphic elements, animated stickers, background removal, and manual adjustment controls for brightness, contrast, saturation, warmth, and sharpness. The transition is seamless enough that resize and creative edit feel like one continuous workflow rather than two separate tools.
Animated Stickers and GIF Support on the Free Plan
For social media creators in particular, the inclusion of animated stickers and GIF elements within the free plan is a differentiator. Motion elements consistently outperform static ones for engagement on most major social platforms, and access to them without a paid upgrade adds real value for creators working within a free account. Combined with one-click text animation options also available in the editor, this gives the platform meaningful utility for social content that goes beyond basic static image preparation.
Adobe Express is a strong fit for users who primarily create social media content, digital marketing graphics, or visual materials for publishing and sharing. It is not the right choice for users who need RAW file support, advanced layer-based editing, or precise color management tools. For those needs, a full online photo editor or desktop software is more appropriate.
Step-by-Step: Completing a Full Resize-and-Edit Workflow
Whether you use Adobe Express or another platform in this category, the following process applies broadly. Walking through this sequence before you commit to any tool is a reliable way to test whether it actually fits your workflow in practice.
- Determine your output requirements before opening the editor. Know the target dimensions, the intended platform, and whether you need a specific file format. This prevents mid-session backtracking.
- Upload the highest quality version of the source image you have. A higher-resolution source gives you more flexibility, particularly if the resize involves any upscaling.
- Apply your resize first. Complete the dimension change before adding any creative elements so that text and sticker placements are scaled to the final output size rather than to a canvas that will change.
- Apply filters next, before layering graphic elements. Filters affect the entire image canvas. Adding them before stickers and text overlays gives you a clean visual base and avoids unexpected interactions between filter effects and layered elements.
- Add text and graphic elements last. Position, scale, and style these elements on top of the filtered, correctly sized image.
- Preview at the download size before exporting. Many editors display images at a zoomed-out or fitted view that can hide quality issues. Zoom to actual size or preview at the intended display size before downloading.
- Choose the right output format. PNG for images with transparent areas or graphic elements with sharp edges. JPG for photographs being shared at reasonable file sizes for web and social use.
Frequently Asked Questions
What is the difference between resizing and cropping an image?
Resizing and cropping are related but distinct operations that produce different results. Resizing changes the overall dimensions of an image, either scaling it down to a smaller size or scaling it up to a larger one, while keeping the entire original content visible. The proportions may change if you enter dimensions that do not match the original aspect ratio, which can stretch or compress the image. Cropping removes a portion of the image entirely, reducing the canvas to a selected area and discarding what falls outside it. In practical terms, you resize when you need an image to fit specific pixel dimensions, and you crop when you need to eliminate parts of the frame or adjust the composition. Most tools in this category offer both features, and using them together, cropping first to improve composition and then resizing to hit target dimensions, often produces the best results.
How do I choose between JPG and PNG when downloading an edited image?
The choice between JPG and PNG comes down to the content of the image and how it will be used. JPG uses lossy compression, which means it reduces file size by discarding some visual data. This is usually invisible at normal viewing sizes, making JPG a good choice for photographs being shared on social media, embedded in emails, or published on websites where file size affects loading speed. PNG uses lossless compression and supports transparency, making it the better choice when your image has a transparent background, contains graphic elements with sharp edges or flat colors, or needs to be edited again later without additional quality loss. For most social media use cases involving photographs with filters and text overlays, JPG is the appropriate choice. For logos, product cutouts, or graphics that will be placed on varied backgrounds, PNG is preferable. For users who need even finer control over compression and output size, the free browser tool Squoosh by Google lets you compare compressed output quality side by side before downloading.
Can I use photos I edit with these tools for commercial purposes?
Whether your edited images are cleared for commercial use depends on two separate factors: the licensing terms of the editing tool itself and the licensing status of any stock assets, icons, fonts, or stickers included in the design. Most free plans allow personal use of outputs without restriction but limit commercial use to paid subscribers or exclude it entirely. Even if the platform permits commercial use on its free plan, individual assets within the library may carry separate restrictions. A stock photo marked for editorial use, for example, cannot legally be used in a paid advertisement regardless of which tool you used to edit it. Before using edited images in paid advertising, client deliverables, e-commerce product listings, or any context where they generate revenue, review the platform’s terms of service for commercial use language and check the licensing status of any included third-party assets.
What file size limits should I expect on free plans?
File size limits on free plans vary across platforms but typically fall in a range that accommodates standard smartphone and web-quality images without issue. Most tools in this category accept files up to 20 to 40 megabytes on free plans, which covers the majority of JPEG and PNG images produced by modern phones and cameras. Where limits become more relevant is with RAW files, high-resolution professional photography, or large PNG exports from design work, which can exceed free-tier maximums. If you regularly work with very large source files, check the specific file size cap before committing to a platform. Some tools also apply limits on the output resolution or dimensions available for download on the free tier, which is a separate consideration from the upload limit. Both limits are worth verifying, since a tool that accepts a large source file but caps the download at a lower resolution defeats the purpose of the upload.
Are browser-based photo editors safe to use for images containing personal or sensitive information?
For images that contain clearly personal information, such as photos of documents, financial records, identification, or recognizable individuals in private settings, extra caution is warranted before uploading to any browser-based platform. Most reputable tools process uploaded images in temporary storage and do not retain them after the session ends, but the specific data retention policy varies by platform and is not always clearly communicated in plain language. A general “we do not store your images” statement in an FAQ is not the same as a detailed privacy policy that specifies retention periods, server locations, and data sharing practices. Before uploading sensitive images, locate the platform’s full privacy policy and look for specific language about uploaded content rather than relying on marketing summaries. For tools operated by established companies with publicly audited privacy practices, the risk is generally low. For newer or less established platforms, the appropriate level of caution is higher, particularly for images containing identifiable personal information.
Conclusion
Finding an online tool that handles photo resizing and creative editing in one workflow is genuinely practical, and the options available at no cost have improved significantly in recent years. The nine evaluation criteria in this article give you a structured way to assess any platform against the specific requirements of your workflow rather than choosing based on name recognition or a first impression formed by the homepage. The three tool categories give you a framework for deciding which level of complexity actually fits what you do, so you are not learning a full photo editor when a quick-action tool handles ninety percent of your needs, or settling for a minimal resizer when you routinely need more.
The most important step is testing the complete workflow, from upload through resize, filter, text, and download, before committing to any platform. Marketing language and feature lists are not reliable substitutes for running your own real images through a realistic task. Spend ten minutes with any tool you are seriously considering, and the decision will become obvious.