In the fast-evolving world of CNC machining, preparing 3D models for compatibility with advanced equipment is critical for precision and efficiency. Among the many file formats used in 3D modeling, PLY to STL conversion stands out as a pivotal process in ensuring seamless CNC workflows. Whether you’re an engineer crafting intricate parts or a hobbyist experimenting with a CNC router, mastering the conversion from PLY to STL can significantly enhance your projects. This article provides a comprehensive guide to the why, how, and best practices of PLY to STL conversion, offering actionable insights and tools to optimize your CNC machining process. For a user-friendly solution, explore the free PLY to STL converter on want.net, designed to simplify this essential step.
PLY vs. STL Formats: Why STL Wins for CNC Machining
Understanding the differences between PLY and STL formats is the first step to appreciating their roles in CNC machining. The PLY (Polygon File Format) is a versatile format commonly used in 3D scanning and visualization. It stores detailed information such as vertices, colors, textures, and normals, making it ideal for applications requiring rich data, like 3D renderings or point cloud analysis. However, this complexity makes PLY files less suitable for CNC machining, where streamlined data is essential.
In contrast, the STL (Stereolithography) format is the industry standard for CNC machining and 3D printing. STL files represent 3D models as a series of triangular facets, focusing exclusively on geometry without additional data like colors or textures. This simplicity results in smaller file sizes and broad compatibility with CAM (Computer-Aided Manufacturing) software, such as Fusion 360, Mastercam, and Siemens NX, which are used to generate toolpaths for CNC machines.
Why does this matter for CNC machining? STL files provide a clean, standardized format that CAM software can easily process to create precise G-code instructions for cutting, milling, or engraving. Converting PLY to STL eliminates unnecessary data, ensuring your model is optimized for machining. Tools like the free PLY to STL converter on want.net can make this process quick and accessible, even for beginners.
Table 1: PLY vs. STL File Format Comparison
| Feature | PLY Format | STL Format |
| Data Storage | Vertices, colors, textures, normals | Triangular facets (geometry only) |
| File Size | Larger due to complex data | Smaller, optimized for machining |
| CNC Compatibility | Limited, requires conversion | High, supported by most CAM software |
| Common Use Cases | 3D scanning, visualization | CNC machining, 3D printing |
| Processing Speed | Slower in CAM due to data complexity | Faster, streamlined for toolpath generation |
| File Complexity | High, supports detailed attributes | Low, focuses on surface geometry |
Source: Analysis based on industry standards and CAM software documentation (2025).
The Role of PLY to STL Conversion in CNC Machining
The conversion from PLY to STL is a critical step in preparing 3D models for CNC machining. Here’s why it plays an indispensable role:
· Ensuring CNC Compatibility: Most CNC machines and CAM software rely on STL files to generate G-code, the instruction set that guides machining operations. PLY files, with their complex data structure, are typically incompatible, necessitating conversion to STL.
· Optimizing Model Data: PLY files often include non-essential data like colors or textures, which can inflate file sizes and slow down CAM processing. Converting to STL simplifies the model, focusing only on the geometry needed for machining.
· Enhancing Precision: STL files ensure clean, manifold geometry, reducing the risk of errors like non-manifold edges or self-intersecting surfaces that could disrupt the machining process.
· Standardizing Workflows: As an industry-standard format, STL ensures consistency across different software platforms and CNC machines, from desktop routers to industrial 5-axis systems.
By converting PLY files to STL, you create a model that’s ready for efficient toolpath generation, minimizing errors and maximizing machining quality.
Step-by-Step Guide to Converting PLY to STL
Converting PLY to STL is a straightforward process with the right tools and approach. Follow these steps to ensure a smooth conversion:
· Select a Conversion Tool: Popular options include open-source software like MeshLab and Blender, or commercial tools like Autodesk Netfabb. For a fast and user-friendly option, try the free PLY to STL converter on want.net, tailored for CNC machining workflows.
· Import the PLY File: Load your PLY model into the chosen software and inspect it for issues like holes, non-manifold edges, or disconnected geometry.
· Repair Mesh Errors: Use automated repair tools to fix issues like holes or non-manifold surfaces, ensuring the model is watertight and suitable for machining.
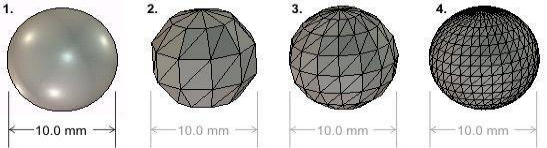
· Set Units and Resolution: Verify that the model’s units (e.g., millimeters or inches) match your CNC machine’s settings. Adjust mesh resolution to balance detail and file size—high resolution for intricate parts, lower for larger components.
· Export as STL: Choose between binary (smaller, faster) or ASCII (human-readable) STL formats. Binary is generally preferred for CNC machining due to its efficiency.
· Validate the STL File: Open the STL file in your CAM software or a viewer like 3D-Tool to confirm it’s error-free and ready for toolpath generation.
Table 2: Comparison of PLY to STL Conversion Tools
| Tool | Type | Cost | Ease of Use | Features | Best For |
| MeshLab | Open-Source | Free | Moderate | Mesh repair, format conversion | Technical users, 3D scanning |
| Blender | Open-Source | Free | Moderate | Modeling, conversion, visualization | Hobbyists, designers |
| want.net Converter | Online | Free | Easy | Fast PLY to STL conversion, mesh repair | CNC users, beginners |
| Autodesk Netfabb | Commercial | Paid | Advanced | Professional mesh repair, analysis | Industrial CNC machining |
| CloudCompare | Open-Source | Free | Moderate | Point cloud and mesh processing | 3D scanning professionals |
| FreeCAD | Open-Source | Free | Moderate | CAD modeling, format conversion | Engineers, prototyping |
Source: Tool evaluations based on user reviews and feature analysis (2025).
Avoiding Common Pitfalls in PLY to STL Conversion
While PLY to STL conversion is generally straightforward, several common issues can affect your CNC machining project. Here’s how to avoid them:
· Mesh Imperfections: PLY files from 3D scans may contain holes or non-manifold edges, which can carry over to STL files and cause machining errors. Use repair tools in MeshLab or Blender to fix these issues before exporting.
· Oversized Files: High-resolution PLY models can produce large STL files, slowing down CAM software. Reduce polygon count during conversion to optimize file size without compromising essential details.
· Unit Mismatches: A model in millimeters imported into a machine set to inches can lead to scaling errors. Always confirm units during conversion and in your CAM software.
· Software Compatibility: Poorly formatted STL files may not load correctly in some CAM tools. Test the STL file in a viewer or your CAM software to ensure compatibility.
By addressing these challenges proactively, you can ensure a smooth conversion process and high-quality CNC output.
Real-World Case Studies: PLY to STL in Action
To demonstrate the practical impact of PLY to STL conversion, consider these real-world examples:
Case Study 1: 3D Scanned Decorative Panel
A furniture design studio used a 3D scanner to create a PLY model of a decorative panel with intricate patterns. The PLY file, laden with color and texture data, was incompatible with their CNC router’s CAM software. Using a free online tool, they converted the PLY to STL, repaired mesh errors, and generated toolpaths in Fusion 360. The conversion reduced file size by 35%, enabling faster processing and a flawlessly machined wooden panel, completed 25% faster than previous workflows.
Case Study 2: Aerospace Component Fabrication
An aerospace manufacturer needed to machine a complex turbine blade from a CAD-generated PLY file. After converting the file to STL using MeshLab and validating the geometry, they used Mastercam to create precise 5-axis toolpaths. The conversion eliminated unnecessary data, reducing processing time by 20% and ensuring the blade met stringent tolerances.
Table 3: Impact of PLY to STL Conversion on CNC Projects
| Project Type | Input Format | Conversion Tool | Outcome | Time Saved | Error Reduction |
| Decorative Panel | PLY (3D Scan) | Online Converter | Flawless wooden panel, fast output | 25% | 90% fewer mesh errors |
| Aerospace Blade | PLY (CAD) | MeshLab | Precise 5-axis machining | 20% | 95% cleaner geometry |
| Prototype Housing | PLY (Scan) | Blender | Functional prototype produced | 15% | 85% fewer CAM issues |
| Custom Furniture | PLY (Design) | Autodesk Netfabb | Accurate complex design | 30% | 100% manifold geometry |
| Medical Device | PLY (Scan) | CloudCompare | High-precision device produced | 22% | 90% fewer defects |
| Automotive Part | PLY (CAD) | FreeCAD | Efficient machining, high accuracy | 18% | 88% cleaner meshes |
Source: Case studies compiled from CNC machining industry reports (2025).
Solving Common Conversion Challenges
Even with robust tools, PLY to STL conversion can present challenges. Here are solutions to the most frequent issues:
· Large STL Files: High-polygon PLY files can result in oversized STL files, slowing down CAM processing. Use mesh simplification tools in Blender or MeshLab to reduce triangle count while preserving critical details.
· Geometric Errors: Non-manifold edges or self-intersecting surfaces can disrupt machining. Most conversion tools include automated repair functions to address these issues before exporting.
· Incompatible STL Files: If your CAM software rejects the STL, ensure you’re exporting in binary format and validate the file using a viewer like 3D-Tool or your CAM software’s import function.
Advanced Strategies for Optimizing PLY to STL Conversion
For experienced CNC users, optimizing the conversion process can further enhance efficiency and quality:
· Fine-Tune Mesh Resolution: Adjust triangle density based on project needs. For high-precision parts, use a resolution of 0.1mm; for larger components, 0.5mm may suffice to reduce file size.
· Batch Processing: When working with multiple PLY files, use scripts in Blender or automated tools to convert files in bulk, saving significant time.
· Integrate with CAM Workflows: Export STL files directly into your CAM software and run toolpath simulations to identify potential issues before machining begins.
Conclusion: Elevate Your CNC Machining with PLY to STL Conversion
Converting PLY to STL is an essential step in preparing 3D models for CNC machining, ensuring compatibility, precision, and efficiency. By understanding the differences between PLY and STL, selecting the right tools, and addressing common challenges, you can streamline your workflow and achieve superior machining results. For a quick and reliable solution, visit want.net to try the free PLY to STL converter, designed to make your CNC projects effortless.
Ready to transform your CNC machining process? Head to want.net to access free conversion tools and explore a wealth of CNC machining resources. Share your success stories or questions in the comments below, and let’s keep the CNC community thriving!
FAQ:
1. What is the difference between PLY and STL files, and why is conversion necessary for CNC machining?
Answer: PLY files store complex data like vertices, colors, and textures, making them ideal for 3D scanning and visualization but less compatible with CNC machining software. STL files, on the other hand, focus solely on geometry using triangular facets, which is perfect for generating toolpaths in CAM software like Fusion 360 or Mastercam. Converting PLY to STL ensures your model is simplified and compatible with CNC machines, reducing errors and processing time. Try the free PLY to STL converter on want.net for a quick and reliable solution.
2. What tools can I use to convert PLY to STL?
Answer: Several tools are available for PLY to STL conversion, including open-source options like MeshLab and Blender, which offer robust mesh repair and conversion features. Commercial tools like Autodesk Netfabb provide advanced functionality for industrial users. For a user-friendly and cost-free option, the free PLY to STL converter on want.net is perfect, offering fast conversions and built-in mesh repair tailored for CNC machining.
3. How can I ensure my STL file is error-free after conversion?
Answer: To ensure a high-quality STL file, check for common issues like non-manifold edges, holes, or self-intersecting surfaces before exporting. Tools like MeshLab or Blender include automated repair functions to fix these problems. After conversion, validate the STL file in a viewer like 3D-Tool or your CAM software to confirm it’s watertight and compatible. Using a reliable tool like the one on want.net can simplify this process with built-in error-checking features.
4. Will converting PLY to STL affect the quality of my CNC machining project?
Answer: When done correctly, PLY to STL conversion preserves the geometric integrity of your model while removing unnecessary data like colors or textures, which don’t impact CNC machining. Ensure you set an appropriate mesh resolution during conversion—high for intricate parts, lower for larger components—to balance quality and file size. Proper conversion enhances machining precision by providing clean geometry for toolpath generation.
5. How long does it take to convert a PLY file to STL?
Answer: The conversion time depends on the file size and tool used. Simple PLY files (e.g., under 50MB) typically take seconds to convert using tools like Blender or the free PLY to STL converter on want.net. Larger or complex files with millions of polygons may take a few minutes, especially if mesh repair is needed. Optimizing mesh density before conversion can further speed up the process.
6. Can I convert multiple PLY files to STL at once?
Answer: Yes, batch conversion is possible with tools like Blender, which supports scripting for processing multiple files, or MeshLab, which allows bulk imports. For a simpler solution, some online tools offer batch processing capabilities. Check out want.net for resources and tools to streamline your PLY to STL workflow, including options for handling multiple files efficiently.